Firewalls

What is a Firewall?

Firewalls are key pieces of network architecture designed to filter data and prevent attacks. Firewalls guard the entry point of a computer, also called a port. A Firewall is like a bouncer. It only lets trusted people, aka IPs, domains, etc, into the club, aka the computer. Internal firewalls guard different sections of this metaphorical club, making sure only certain people go backstage, upstairs, etc. Firewalls come in different varieties, hardware, and software. The most common type of firewall is a packet-filtering firewall. This type of firewall checks the packet’s source and destination and makes a decision as to whether it should be let through.

History

What is a Web Application Firewall and How Does it Protect Your WordPress Site? | Elegant Themes Blog

The first firewalls were developed in 1980 by the companies Cisco and DEC. They were called “Network Layer” and were very basic and easily bypassable. In the 1990s, a new generation of firewalls was invented. “Application Layer” firewalls were harder to set up, but they were more thorough and were better at filtering data. The firewalls we have today are a hybrid of these two types.

Security Risks

1. Outdated Software

Firewall providers often update their firewalls to combat new exploits and fix issues. By patching vulnerabilities the firewall can become more resilient against attacks. Advanced software from 2018 might not hold up in today’s world. If you aren’t proactive about updating your firewall, you may run the risk of a damaging breach or a DDoS.
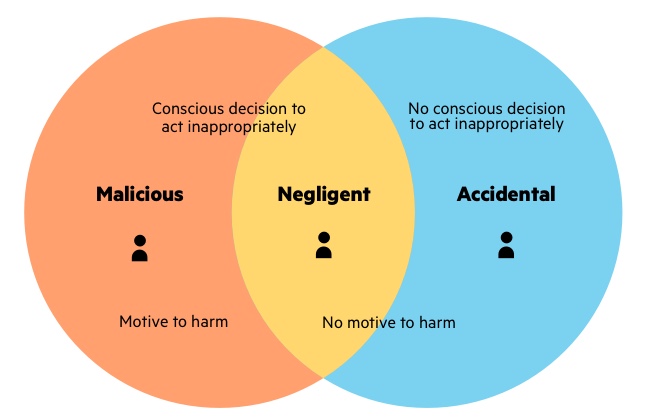
2. Internal Attacks

Firewalls cannot detect insider threats because firewalls focus on filtering external data, and cannot detect anything that has passed into the network. If a turncoat, mole, or careless employee allows data to bypass a firewall, then the network can be destroyed from the inside without ever touching a firewall.

insider threat

3. Basic Inspection Protocols

If firewalls are set up quickly, they may only look at the sender and receiver of a packet, rather than the packet itself. Hackers can “spoof” network firewalls and make it seem like a packet is coming from somewhere it isn’t.

Proposed Solutions

Many of these problems can be fixed with proper protocol and maintenance. Basic maintenance can fix outdated software. A dedicated IT team or one passionate user can keep a firewall up to date. Newer firewall systems, called “next-gen” firewalls test the content of a packet by using layer 7 deep packet inspection. Insider attacks are the trickiest of the three. There are some basic practices you can use to mitigate insider threats.

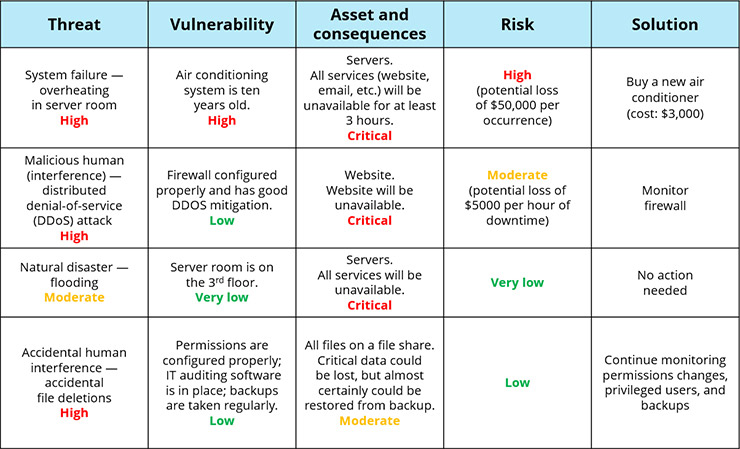
1. Perform Risk Assessments

Find what your riskiest assets are, their vulnerabilities, what the consequences of a breach would be, and then prioritize enhancing your security. It can be good to make a table out of your data. Here is an example:

2. Establish Physical Security

A good way to stop someone from getting inside your network and keeping them out of the physical spaces. A security team, cameras, or even just locks on server room dorms will keep unwanted agents away. Making sure to check people for unauthorized devices before going into a room with important IT devices can be a good step towards safety. All of this will, at least, help maintain a good security theater. Every day the TSA finds 11 guns in carry-on bags. The TSA spends 8.6 billion per year. That means it costs about 2,141,967 just to stop a single person from bringing a gun on a plane. So why does the US government continue paying for this security? Because it prevents countless people from trying to bring a gun on a plane. The idea of a security team can be scarier than the team itself.

35,956 Security Guard Stock Photos, Pictures & Royalty-Free Images - iStock

3. Software

Certain products, such as Firewall Analyzer or Ekran System can be a good way to prevent an insider attack. These solutions can monitor and flag suspicious activity. These systems can record video conferences, monitor VPN usage, searches, and can detect USB devices. It’s very hard to stop an insider attack, because the user may have complete access to your systems, but with the correct software, you can be alerted before the attack ever happens, and prepare damage control, fire the perpetrator and protect your assets.

Searching

Conclusion:

In conclusion. Firewalls are great protection against outside threats like DDoS and XSS attacks. Many of their shortcomings can be mitigated by proper maintenance and usage. What they have in external security they lack in internal protection. Insider attacks can bypass firewalls but can be properly dealt with via software and proper regulation. Physical security and risk assessments can help against insider attacks. With new innovations in tech happening every day, hackers getting stronger, companies creating updating security technology, firewalls are here to stay, for now.

Sources:

https://www.checkpoint.com/cyber-hub/network-security/what-is-firewall/

https://www.forcepoint.com/cyber-edu/firewall

https://www.britannica.com/technology/firewall

Insider Threat

https://www.trustnetinc.com/firewall-vulnerabilities/

https://www.netwrix.com/Insider_Threat_Prevention_Best_Practices.html

https://www.netwrix.com/information_security_risk_assessment_checklist.html

https://www.ekransystem.com/en/solutions/preventing-insider-threat

AppleTalk

Every computer has an IP address and connects to a router to communicate. That’s how it’s always been, right? Turns out Apple once had a radical idea of connecting Local Area Networks without a router.

AppleTalk

AppleTalk automatically assigns addresses, namespace, and configured inter-network communication without the need to set up a router or do anything else prior. AppleTalk was invented in 1983 under the name AppleBus. During this time, Apple wanted to create a way to connect devices together efficiently using the new SCC chip. They wanted to make a user-installable, zero setup, plug-and-play network. AppleBus was announced in 1984. Before its 1985 release, AppleBus was renamed AppleTalk. Due to its lower speed of 230 Kbit/s, Apple was able to sell AppleTalk for a fraction of its competitors, and AppleTalk was marketed as a “Personal Network”. The main advantage of AppleTalk was that it was maintenance-free. All you had to do was plug in an adapter. As AppleTalk expanded, they added support for integrating into existing ethernets systems. In 1989 the revamped AppleTalk in an attempt to make it more generic. The revamp also allowed for AppleTalk to connect to a wider variety of devices. AppleTalk became a legacy system in 2001 and was discontinued in 2009. As of 2020, AppleTalk has been completely removed from legacy support.

Binary Noises

Binary is the language of computers. Everything that you can put on a computer is represented in binary. From images to songs and much more. Binary is a base 2 counting system. Computers have 2 base values, powered and unpowered, so they can only count in base 2. Each digit in binary has a value of 2^(digit-1). The first digit when displaying 1 is worth 1. But the next digit is worth 2, so now we can make 3 by combining them like this: 11. This gets more complicated because as we add more digits the possible numbers multiply exponentially. so the third digit is worth 4, so now we can make 4: 100, 5: 101, 6: 110, and 7: 111. These numbers allow computers to store values as a series of on and off switches. But how do computers display characters? Each of the 255 characters typable on a keyboard is assigned to a value, pretty simple, but what about images. Images, at their simplest, are stored as numbers as well. long strands of numbers represent colored and uncolored pixels. 0,10,5,2 would display 0 white pixels followed by 10 black pixels, then 5 white and 2 black. It gets more complicated as we add more colors and tones, but that is the basic principle.

Audio:

But how do you represent audio? You can just store every possible sound and assign each one to a number, and even if you did it would take gigabytes to send 1 second of audio. But the trick is in the audio itself.

We hear sound waves. Everything our ears can process is represented by a wave that looks like this:

The wave moves up and down over time as the sound changes and evolves, using this graph which we can detect with microphones, we can plot points on the graph represented in binary like this:

The sampled sound wave doesn’t capture anything that happens between the points, so it loses finner details of the audio. Hertz represents the number of samples per second. Most audio is sampled from 44-48k hertz, meaning they plot that many points on the graph per second.

Sources and Images:

https://www.bbc.co.uk/bitesize/guides/zpfdwmn/revision/3

My Current Favorite Wargames

I love wargames. The variety in every game and sheer number of titles can seem very overwhelming, so I wanted to talk about my 2 favorites at the moment.

Hordes

After trying it out at PAX, I was instantly hooked. One of the things that bugs me about wargames is how after placing all your soldiers they get destroyed quickly. In hordes, you instead control a small group of powerful units. Each unit feels unique, and each soldier plays differently. Each faction has unique mechanics and each unit feels impactful in the game. The models are also super detailed and pretty.

Frostgrave

Getting into wargames can be scary. It’s a big investment. Frostgrave gets around this with its class system. You create custom character sheets for each model you own, meaning your toy soldier can be a crossbow man. The DND-like system means each unit in your army feels unique and special. One of the things I like as well is that their model sets they do have are modular. Each chest plate is unique and can combine with any of the heads, arms, weapons, and legs.

Guide: Dry Brushing

In this guide, I will be explaining the advantages of dry brushing and how to use it. Dry brushing can help you add that next level of detail to your models.

When to Use Dry Brushing

Dry brushing is best used to highlight detailed areas on a model. You can drybrush armor to give it a feeling of being worn, drybrush metal with flecks of silver to get a more natural shine or drybrush hair to highlight parts that jut out.

How to Dry Brush

Dry brushing is pretty simple. Add paint onto your brush then brush off the paint on a piece of paper until it no longer marks it. Then take large hard strokes over your mini and the small flecks of paint will stick to the pointy bits on your model. You can see this effect on the sword and cloak of this model.

Guide: Top 3 Tips for Painting

There are a lot of things that you learn while painting that don’t seem intuitive, so here is my list of the top 3 things you should know before painting.

1. Paint in groups.

It may seem tempting to work on 1 mini at a time, but that is incredibly inefficient. Group up similar minis and paint 1 color at a time, this way you have to switch colors less often and get more practice with each color.

2. Don’t use too much.

If you accidentally thin your paints a little more than you should you may find a layer of paint that looks translucent. Don’t add more watered-down paint. Let each layer dry, then apply more paint, otherwise, the paint will pool together and your mini will lose definition.

3. Buy a tiny brush.

You might purchase a pack of brushes, or try to use some smaller oil paintbrushes to paint your minis. It might seem stupid to spend 5 dollars on a brush with a tip as thin as a piece of hair. But it is so helpful. You can use tiny brushes to paint thin lines, get in between pieces, or fix small mistakes. It is one of my most important tools.

I hope this was helpful, and good luck.

Guide: Painting Your Minis

So you have assembled your miniatures, the next step is of course painting. Painting can be stressful since it is the most important (and tedious) part. It may seem like a daunting task, but that’s all in your head. Worst case scenario you can strip the paint and try again.


Step 1

The first thing you should do is plan your colors. Maybe you want to paint them just like the box, or maybe you want to alter the colors, either way, you should figure out every color on your mini. The last thing you want is to get brown and green paints only to discover your mini has a black satchel. Acrylic is generally my go-to paint, but it’s up to you what type of paint you want.


Step 2

You may be tempted to dive straight in and start painting, but preparation is key. Make sure you have a cleared workspace and a wet palette. You can buy wet palettes on Amazon, but I recommend making them yourself. Find a Tupperware container, put a few sheets of paper towels in, you may need to cut them so they fit snuggly, then add enough water into the container so that all the towels are wet but no water pools at the bottom. then ad a sheet of wax paper to the top. The wet palette will preserve your paints and thin them out. Prepare a few small brushes, a cup of water, and a few paper towels.


Step 3

Now you can start painting. You may be tempted to paint the armor plates and jewels, but you should always start with the base. While the dull clothing colors might not seem very fun, it is essential to start with them. Painting base colors allow you to explore your mini and find details you hadn’t seen before, it is also less annoying if you accidentally paint over your base color. Make sure to use thinned-out paints, otherwise, your mini may look glossy and lose some of its details.

Step 4

Now that you’ve painted the base layer, you are going to want to work up from there, painting the more common colors before painting tiny details. The most important thing to remember is that painting should be fun. Make sure to take breaks, and remember that even if you mess up, everything is fixable. It won’t look like the box art, but it’s yours.

Guide: Assembling Your Models

So you have found a model you like, but are unsure how to assemble it. The process is pretty simple but there are a few tricks that might not be too obvious.

Step 1: Fake Assembly

Before you start glueing like a mad man you should try seeing how all the pieces fit together. Assembling it without glue can help you see which parts to glue first, and which to glue after you paint them. You don’t want a pesky shield blocking you from painting your knight’s chest plate.

Step 2: Assembly

If you are using plastic models this step will be fairly easy. Just grab some super glue from your local hardware store and add a few drops to each section. It’s always better to underdo and reglue, so keep that in mind before you pour the entire bottle out. If you are assembling metal models you may want to prime your models first before glueing, as the primer can help the glue adhere to the metal.

Step 3: Priming

So your models are coming together, but before you start painting, make sure to prime your model. Priming helps the paint adhere to the model and keeps it from flaking off, it also acts as a base colour. If you paint directly on metal models your paint may look shiny or glossy. To prime, simply place your models on an old newspaper or canvas, and use a white spray-on primer. Make sure to go lightly, moving in left and right motions, as the last thing you want to do is overprime, because then the paint will pool together and cover the finer details of the model. Make sure to lightly spray each side multiple times, waiting 30-45 minutes in between. Make sure you do this in a well-ventalated area while wearing the proper safety equipment, as inhaling paint fumes can be very dangerous. If you want a little more detail on your models, you can prime them in a special way. Prime them in black, then spray them top-down with a light white coating, this way, the tops of the models with be lighter than the bottoms, and when you paint the colors of your paints will vary in shade.


And now you’re done. Not that hard right? The thing to remember is the more time you put in the more you will get out. So be patient while you assemble and prime.